Tesseract Models with the Python SDK
The Tesseract Compute Engine allows you to scale spatio-temporal analysis to massive scales and fuse datasets that are in different formats and locations with a simple job description. Running arbitrary processing or models is done through the use of Docker containers.
In this tutorial we will cover how to create the docker image that will do the processing. The Tesseract Python SDK helps you to build docker containers that can be used with the Tesseract Compute Engine.
Overview
To use a docker image in Tesseract you just need to follow these steps:
Install the SDK
Create python script that will be the entrypoint
Implement two required functions: inference and get_model_info
Build, validate and push the docker image to a registry
We will go over all of these steps with a simple example that will serve as a template to build other, more complex models.
Installation
The SDK can be installed with pip:
pip install tesseract-sdk
Test that the install worked by running:
tesseract-sdk --help
This will allow us to use the tesseract CLI to validate our image.
Python Script
The python script will be the entrypoint to the docker image. It will be called by the Tesseract Compute Engine and will be responsible for loading the model,running inference or any other processing you would like to do on the inputs. The script only needs to have two functions: inference and get_model_info. The inference function will be called for each chunk of data to be processed and the get_model_info function just lets Tesseract know what inputs and outputs should be expected so that some basic validation can be performed.
Lets look at a minimal example script called run_tesseract.py:
import logging
from tesseract import serve
import numpy as np

def inference(assets: dict, logger: logging.Logger, **kwargs) -> dict:
    logger.info("Running my custom inference function")

    sum_of_inputs = np.sum(assets['$0'], axis=1, keepdims=True) # Sum all of the bands in the input

    return {'sum_of_inputs': sum_of_inputs}

def get_model_info() -> dict:
    return {
        "inputs": [{
            "name":"in_asset",
            "dtype": "float32",
            "shape": [1, 2, 1024, 1024]
        }],
        "outputs": [{
            "name":"sum_of_inputs",
            "dtype": "float32",
            "shape": [1, 1, 1024, 1024]
        }]
    }

if __name__ == "__main__":
    serve(inference, get_model_info)
Lets look at what each part of this script is doing. First of all the inference function can take several arguments, in this case we are using assets and logger.
The assets argument is a dictionary that contains all of the inputs to the model. Assets can be accessed in two ways, by the input name, or by its position in the tesseract job. In this example we use the input in the first position ($0). Each key in assets will contain a 4D numpy array with one chunk of data from the input. The array will always have dimensions [time, bands, height, width]. In the example we are using a non-temporal dataset, so the time dimension is 1.
The logger argument is a python logger that can be used to output information to the Tesseract logs. These logs are accessible from the tesseract job after running. We will look at this later.
The processing that is done in the inference function is very simple, it just sums all of the bands that are passed as input. This is not a very useful model but shows that we can perform any processing we want on the input assets. The output of the inference function is a dictionary with the results as numpy arrays similar to the assets input. In this case we are returning a single output called sum_of_inputs. Notice that its second dimension will have size 1 because we have summed all of the bands.
The get_model_info function is used to tell Tesseract what inputs and outputs to expect. This is used to validate the model before running it. The inputs and outputs are defined as a list of dictionaries. Each dictionary has three keys: name, dtype and shape. The name is the name of input or output. The dtype is the data type of the input or output. Any numpy dtype strings will work for these (eg. ‘float32’, ‘<i2’, etc…). The shape is the shape of the data that is expected. This will always be a 4D array with dimensions [time, bands, height, width]. In the case where outputs are not temporal, the time dimension will be 1. We will discuss how to run validation later.
Building the Docker Image
Now that we have our python script we need to build the docker image. We only need to install any dependecies that are needed to run the python script and set it as the entrypoint. Our dockerfile should look like this:
FROM python:3.10-slim-buster
RUN python -m pip install --upgrade pip \
    && pip install tesseract-sdk numpy

COPY run_tesseract.py /run_tesseract.py
ENTRYPOINT ["python", "-u", "/run_tesseract.py"]
This will install the tesseract-sdk and numpy and then copy our python script to the image. When the image is started it will run the python script as the entrypoint. The -u flag is important because it will make python use unbuffered output. This ensures that logs get output to the Tesseract logs. We can then build the image with:
docker build -t my_model:latest .
Validating the Docker Image
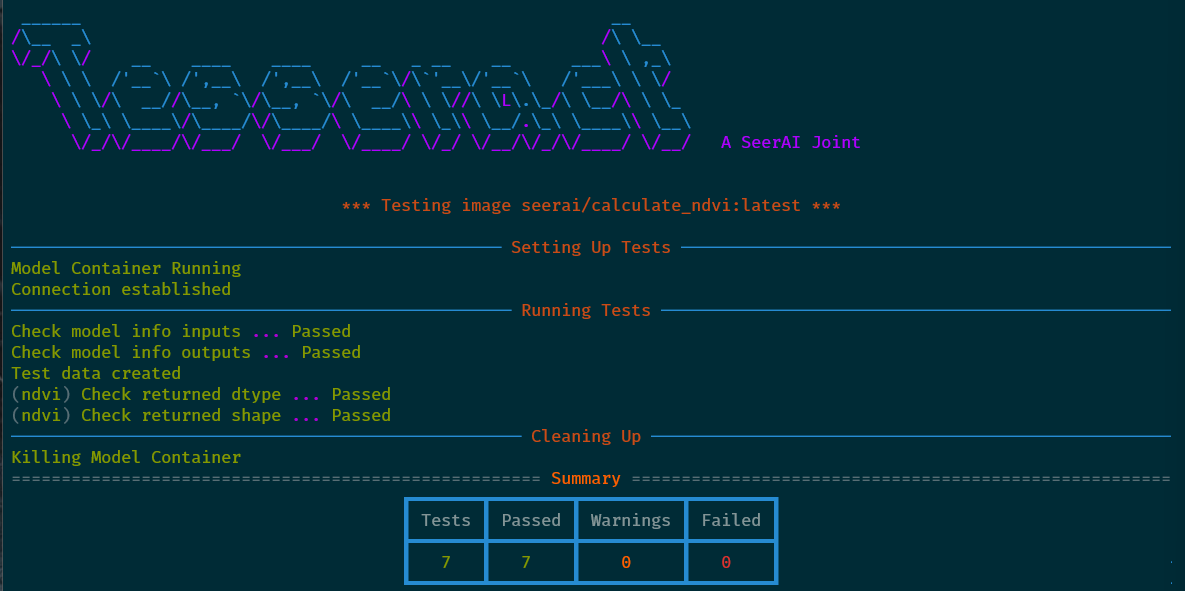
Now that we have our docker image we can validate it with the tesseract CLI. This will ensure that the image has all of the required inputs and outputs and that the image can be run. To validate the image we can run:
tesseract-sdk validate my_model:latest
This tool will spin up the docker image and attempt to simulate it running in Tesseract. It then passes some random data to the model and checks that the outputs are the correct shape and type. It is also possible to pass real data to the model to validate that it is working correctly. This will be covered in another tutorial. When the tool runs you should see output like this:
Pushing the Docker Image
With a validated docker image in hand we just need to put the image somewhere that Tesseract can get to it. This can be just about any Docker registry. In this example we will use Docker Hub. To push the image to Docker Hub we first need to login:
docker login
Then we can push the image:
docker push my_model:latest
Whats Next?
Next we will look at how to run this model in Tesseract. The next tutorial, Running Tesseract Jobs, will cover how to describe a tesseract job using the model that we just built. We will also look at how to run the job, monitor its progress and inspect the results.
